ROS & Robotics
나를 슬프게 하는 좌표계 변환(TF)에서 삽질 적게 하기
- -
로봇은 참 다양한 센서들로 구성되어 있다. 안타까운 점은 모든 센서마다 좌표계가 다 다르다는 점이다.
그래서 로봇을 다루는 엔지니어 스튜던트라면 좌표계 변환(Transformation)을 밥 먹듯이 할 수 밖에 없다. 아니, 사실 로봇을 안 다뤄도 해야 한다. 센서와 공간을 다룬다면 모두가 갖춰야 할 소양인 것이다.
그렇지만 이 좌표계라는 놈은 정말 너무 헷갈린다. 그래서 소양이 부족한 나는 종종 귀찮기도 하여서 파라미터를 이리저리 바꾸면서 "이번에는 맞게 해주세요"라고 기도하며 정확한 TF를 얻기 위해 몇 시간을 허비한 적이 있는데, 대부분의 경우 머리털만 좀 더 빠지고 여전히 내가 원하는 정확한 결과는 얻을 수 없었다.

그래서 때려 맞추는 것 보다 좀 더 정답에 빨리 갈 수 있는 노하우가 있을까 고민하고 있다. (꼼꼼하고 명석하게 계산을 잘 하는 게 제일이겠지만... 꼼꼼 & 명석과 거리가 너무 먼 이슈로)
내 생각에 좌표계 변환을 직관적으로 할 수 있는 팁들은 다음과 같다.
1. 단계별로 변환 분리하기
def calculate_orientation(self, arrow_angle, front_score):
    # 1. 기본 방향 설정 (-x축)
    base_direction = self.set_initial_direction()

    # 2. Roll 회전 (x축 중심)
    rolled = self.apply_roll(base_direction, arrow_angle)

    # 3. Pitch 회전 (y축 중심)
    pitched = self.apply_pitch(rolled, front_score)
def apply_rotations(self, initial_pose):
"""
회전 순서를 명확하게 명시
1. 먼저 카메라 -> 로봇 기본 변환
2. -x축 정렬을 위한 초기 회전
3. Roll (x축) 회전
4. Pitch (y축) 회전
"""
# 각 단계를 함수로 분리하여 관리def transform_with_debug(self, point_camera):
# 1. 카메라 좌표계에서의 위치 출력
rospy.loginfo(f"Camera frame: {point_camera}")
# 2. 변환 행렬 출력
rospy.loginfo("Transform matrix:")
rospy.loginfo(self.transform_mat)
# 3. 변환 후 결과 출력
point_transformed = self.transform_point(point_camera)
rospy.loginfo(f"After transform: {point_transformed}")
이런 식으로 분리해서 뭐가 어떻게 돌아갔는지 점검하면서 가거나,
2. 시각화 도구 활용
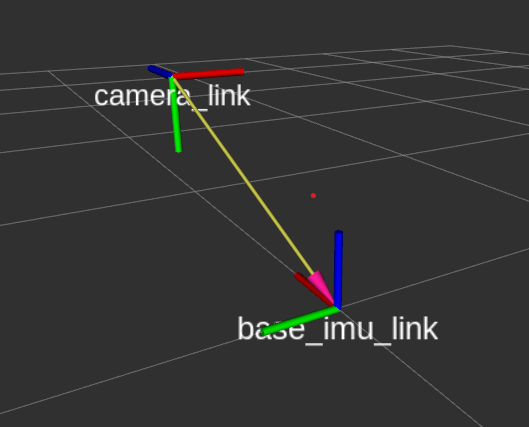
RViz의 marker 도구를 활용해서 시각적으로 확인하는 것이다.
# Debug 마커 추가
def visualize_frame(self, frame_position, frame_orientation, frame_name):
    marker = Marker()
    marker.header.frame_id = "base_imu_link"
    marker.type = Marker.ARROW
    marker.scale.x = 0.2  # x축 (빨간색)
    marker.scale.y = 0.02
    marker.scale.z = 0.02
    marker.color.r = 1.0
    marker.color.a = 1.0
    marker.pose.position = frame_position
    marker.pose.orientation = frame_orientation
그래서 먼저 TF를 발행해서 내가 다루는 좌표계의 관계를 시각화하고, 변환 단계마다 중간 결과를 확인하고, 각 단계를 독립적으로 테스트해서 몇 번째 변환이 잘못되었는지 빨리 알 수 있도록 코드를 잘 분리하는 것이 좋다.
Transformation from Camera Coordinate to Robot Base Coordinate
GS같은 Novel view synthesis는 (Camera → World)로 TF를 수행하고 SLAM에서는 LiDAR → Robot frame (주로 IMU) → Submap → Global map 뭐 이런 식으로 TF를 하게 된다. 내가 요새 다루고 있는 태스크는 이미지를 이용한 로봇 매니퓰레이터 제어 태스크이므로 Camera → Robot frame으로 좌표계 변환을 해야 한다. 이를테면 나는
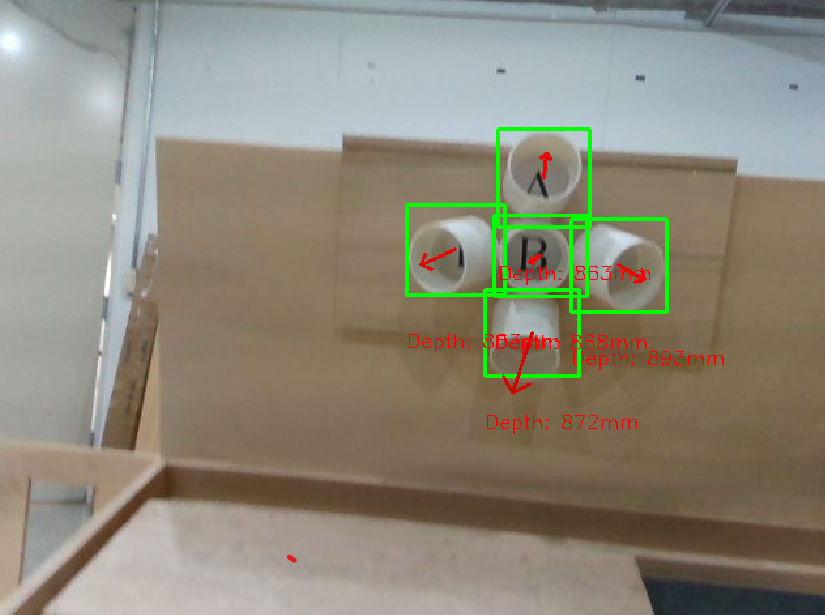
이미지에서 feature를 뽑아서 컵의 방향을 얻었는데, 2차원 이미지 상에 있는 방향을 3차원 6-DoF pose로 변환해야 하는 것이다. 여기서 조금 까다로운 것은 저 평면적인 arrow의 방향을 3차원으로 잘 매핑해주는 것이다. (이미지 인식 모델을 만들 때 나는 화살표의 방향과 길이로 컵의 정면성을 정의했다.)
이 과정을 수행하려면 내게 필요한 파라미터들은 다음과 같다.
- 카메라 intrinsic parameter
- 이미지 좌표계 → camera 좌표계
- 캘리브레이션으로 구함
- 카메라 extrinsic parameter
- camera 좌표계 → 로봇 base 좌표계
- 내 태스크에서는 일단 로봇 좌표계 == World 좌표계이기 때문에 URDF나 캐드모델에서 구함


Realsense는 이미지의 좌상단이 원점이다. 그리고 로봇은 주로 진행 방향이 x축이다.
모든 태스크가 그렇겠지만 TF는 한 단계씩 차근차근 돌리는 게 최선이다.
tf_handler
우선 TF만 따로 관리하기 위해서 ROS에서 tf_handler라는 패키지를 만든다.
tf_handler/
├── config/
│   └── realsense.yaml
├── src/
│   └── tf_handler_node.py
├── CMakeLists.txt
└── package.xml
내부는 늘 그렇듯이 이렇게 생겼다. 모든 변수는 yaml에서 관리해 주는 게 편하다.
# config.yaml
# Camera intrinsic parameters
camera_d435:

  fx: 607.99951171875
  fy: 607.8468627929688
  cx: 325.8788757324219
  cy: 233.54624938964844
  width: 640
  height: 480

trans_x: 0.5
trans_y: 0.2
trans_z: 0.5

target_trans_x: 0.5
target_trans_y: 0.5
target_trans_z: 0.5
그리고 python 코드에서는 bounding box, depth 등을 구독하고 marker_array(시각화용)와 pose(찐 결과)를 publish 하도록 한다. 참고로 bbox(position_x, position_y)와 depth(position_z)를 함께 사용해서 최종 pose를 계산할 것이라면 message_filter를 사용하는 것이 좋다.
# tf_handler_node.py

		# Publisher
        self.marker_array_pub = rospy.Publisher('/detected_cups', MarkerArray, queue_size=1)
        self.pose_pub = rospy.Publisher('/detected_cup_pose', PoseStamped, queue_size=1)

		# Synchronized subscribers
        self.bbox_sub = message_filters.Subscriber('/cup_bbox', Float32MultiArray)
        self.depth_sub = message_filters.Subscriber('/cup_depth', Float32MultiArray)
        self.arrow_sub = message_filters.Subscriber('/cup_arrow', Float32MultiArray)

         self.ts = message_filters.ApproximateTimeSynchronizer(
            [self.bbox_sub, self.depth_sub, self.arrow_sub],
            queue_size=1,
            slop=0.1,
            allow_headerless=True
        )
        self.ts.registerCallback(self.synchronized_callback)

        self.tf_broadcaster = tf2_ros.TransformBroadcaster()
        self.timer = rospy.Timer(rospy.Duration(0.1), self.publish_transforms)
        self.setup_transforms()
setup_transform
우선 카메라 → 로봇의 tranformation matrix를 먼저 정의해준다. 좌표계 회전과 이전에 정의해둔 translation matrix를 사용한다.
    def setup_transforms(self):
        # Rotation : for Unitree Go1 + Realsense
        # 카메라 좌표계:
        # - x: 오른쪽
        # - y: 아래쪽
        # - z: 전방

        # 로봇 좌표계 (camera_link):
        # - x: 전방
        # - y: 왼쪽
        # - z: 위쪽

        # 따라서:
        # 카메라 z -> 로봇 x (전방)
        # 카메라 -x -> 로봇 y (왼쪽)
        # 카메라 -y -> 로봇 z (위쪽)

        """
        [[r11, r12, r13, tx],
        [r21, r22, r23, ty],
        [r31, r32, r33, tz],
        [0,   0,   0,   1]]
        """

        self.rot_mat = [[0,0,1,0], [-1,0,0,0], [0,-1,0,0], [0,0,0,1]]

        transform_mat = np.array(self.rot_mat)

        transform_mat[0,3] = self.trans_x
        transform_mat[1,3] = self.trans_y
        transform_mat[2,3] = self.trans_z
        self.transform_mat = transform_mat

        self.inv_transform_mat = np.linalg.inv(self.transform_mat)
그리고 tf broadcast를 위해 publish_transforms를 정의해준다.
    def publish_transforms(self, event):
        # 카메라 프레임 발행
        camera_transform = geometry_msgs.msg.TransformStamped()
        camera_transform.header.stamp = rospy.Time.now()
        camera_transform.header.frame_id = "base_imu_link"  # 부모 프레임
        camera_transform.child_frame_id = "camera_link"     # 자식 프레임

        # 카메라의 위치 설정
        camera_transform.transform.translation.x = self.trans_x
        camera_transform.transform.translation.y = self.trans_y
        camera_transform.transform.translation.z = self.trans_z


        # rotation matrix를 쿼터니언으로 변환
        q = quaternion_from_matrix(self.transform_mat)
        camera_transform.transform.rotation.x = q[0]
        camera_transform.transform.rotation.y = q[1]
        camera_transform.transform.rotation.z = q[2]
        camera_transform.transform.rotation.w = q[3]

        # Transform 발행
        self.tf_broadcaster.sendTransform(camera_transform)
bbox_callback
이미지에서 들어오는 애들을 바꿔 줄 차례이다. bbox_callback 함수 내에서 pixel 좌표계의 점들을 camera 좌표계로 옮겨준다.
            for cup_idx, (bbox, depth, arrow_info) in enumerate(zip(self.cup_bboxes, self.cup_depths, self.arrow_infos)):
                x, y, w, h = bbox
                arrow_angle, _, front_score = arrow_info

                center_x = x + w/2
                center_y = y + h/2

                cam_x = (center_x - self.cx) / self.fx
                cam_y = (center_y - self.cy) / self.fy

                depth =self.cup_depths[cup_idx] / 1000.0

                point_camera = [
                    cam_x * depth,
                    cam_y * depth,
                    depth
                ]

                point_trunk = self.transform_point(point_camera)

                dx = point_trunk[0]
                dy = point_trunk[1]
                dz = point_trunk[2]
그리고 제일 복잡한 TF 부분을 calcalate_orientation에서 모두 할 수 있도록 일감을 몰아 준다.
                pose_msg.pose.position.x = point_trunk[0]
                pose_msg.pose.position.y = point_trunk[1]
                pose_msg.pose.position.z = point_trunk[2]

                q = self.calculate_orientation(arrow_angle, front_score)
                pose_msg.pose.orientation.x = q[0]
                pose_msg.pose.orientation.y = q[1]
                pose_msg.pose.orientation.z = q[2]
                pose_msg.pose.orientation.w = q[3]
calculate_orientation
이 부분이 제일 헷갈리는 부분이었다.
우선 나는 cup_arrow라는 토픽에 (angle, arrow_scale) 정보를 담고 있다. arrow_scale은 컵이 얼마나 정면을 보고 있는지에 대한 정보를 담고 있다.

우선 물체 좌표계를 정의한다. 나는 기본적으로 컵이 로봇을 바라보는 방향으로 있다고 정의하고 여기서 돌리고 싶었다. 물체의 initial pose를 정의하지 않으면 문제가 더 복잡해지기 때문에 이렇게 가는 게 좋다.
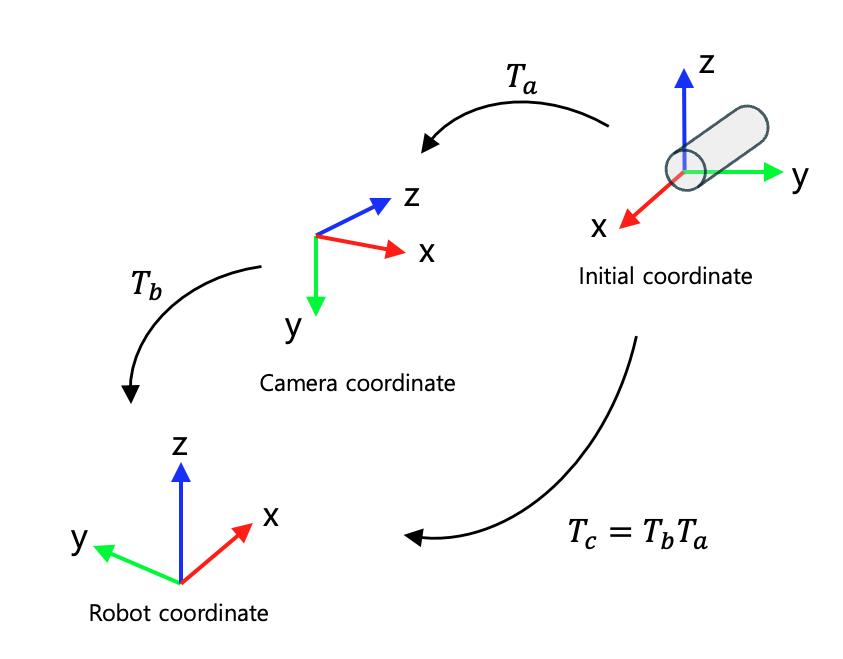
그래서 T_a는 다음과 같이 정의할 수 있다.
        # 물체 좌표계 -> 카메라 좌표계
        T_cup_to_camera = np.array([
            [0,1,0,0],
            [0,0,-1,0],
            [-1,0,0,0],
            [0,0,0,1]
        ])
이렇게 물체의 좌표계를 정의하고
        T_camera_to_robot = self.transform_mat

        T_cup_to_robot = np.matmul(T_camera_to_robot, T_cup_to_camera)

        q = quaternion_from_matrix(T_cup_to_robot)
이렇게 기본적으로 orientation이 로봇을 바라보게끔 나온다. 그러면 롤피치요는 다음과 같은 방향이다.
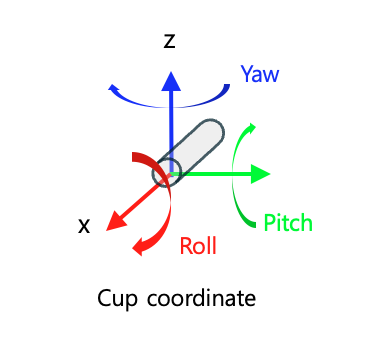
컵이 위를 보고 있는지 아래를 보고 있는지 정의한다.
        is_pointing_up = -180 <= arrow_angle < 0

        # arrow_angle을 roll 값으로 변환
        if is_pointing_up:
            yaw = 90 + arrow_angle/2
        else:
            yaw = 90 - arrow_angle

그러면 이렇게 일단 yaw값은 잘 나오는 걸 확인할 수 있다. 그 다음은 pitch값인데,

front_score가 클 수록 0에 가까워야 한다.
        # arrow_angle을 기반으로 yaw 값 계산
        # front_score를 기반으로 pitch 값 계산
        if is_pointing_up:
            yaw = 90 + arrow_angle/2
            pitch = -90 * (1.0 - front_score)
        else:
            yaw = 90 - arrow_angle
            pitch = 90 * (1.0 - front_score)
이후 이렇게 구한 값을 dot 해서 최종 변환 행렬로 만들어주면 된다.
        T_yaw_cup = np.array([
            [np.cos(yaw_rad), -np.sin(yaw_rad), 0, 0],
            [np.sin(yaw_rad), np.cos(yaw_rad), 0, 0],
            [0, 0, 1, 0],
            [0, 0, 0, 1]
        ])

        T_pitch_cup = np.array([
            [np.cos(pitch_rad), 0, np.sin(pitch_rad), 0],
            [0, 1, 0, 0],
            [-np.sin(pitch_rad), 0, np.cos(pitch_rad), 0],
            [0, 0, 0, 1]
        ])

        T_cup = np.dot(T_yaw_cup, T_pitch_cup)
        T_final = np.dot(T_cup_to_robot, T_cup)

        q = quaternion_from_matrix(T_final)
그럼 대략 이렇게 컵의 pose를 구할 수 있다. 물체의 6-DoF pose를 구하는 데에는 다양한 방법이 있어서 매우 고심하기는 했는데, 이번 태스크는 제약 조건(매우 한정적인 GPU 자원, 컵과 버튼의 사이즈가 변경될 수 있는데 매우 빨리 adapt 시켜야 함, 특정한 방향으로만 매달려 있음, pose GT를 구하는 걸 직접 해야 해서 finetuning 어려움 등등)이 많아서 이런 방식을 강구할 수 밖에 없었다.
다음 번에 할 때는 좀 더 뇌피셜 말고 다들 하는 방식으로 해야지...
'ROS & Robotics' 카테고리의 다른 글
| Ubuntu Terminator 레이아웃 저장하기 (0) | 2025.10.11 |
|---|---|
| ROS 실전 개발 시 까먹지 말아야 할 것들 (0) | 2025.05.04 |
| 이미지 세그멘테이션 결과를 이용해서 포인트 클라우드 복원하고 색칠하기 (Point cloud colorization using segmentation result) (2) | 2024.06.27 |
| ROS Message filter 메시지 필터 (0) | 2024.02.04 |
| ROS message filter: waitForTransform() Lookup error (0) | 2024.02.04 |
Contents
소중한 공감 감사합니다